Showing posts with label Big Picture Scrapbooking. Show all posts

Tuesday, January 15, 2008

Japanese Stab Binding Book

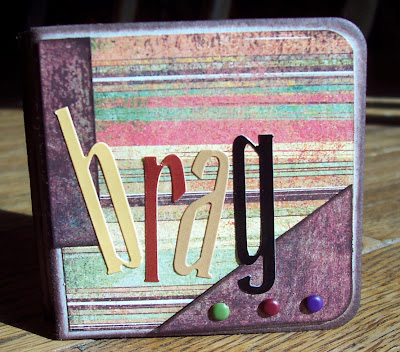
I took a break from the baby book for a night and created this really easy Japanese Stab Binding book. I got the directions from Big Picture Scrapbooking in their Book of the Month workshop for January (This is an ongoing class that you can sign up for monthly. Each month there will be directions for making a different type of book). I haven't added photos to it yet, but my plan is to make it a "2007 Year in Review" book. Hopefully, I can do more with it Friday night at my monthly Friday night crop session at Memories on 5th in Coralville.

Front Cover:

Back Cover:
Inside Front Cover:
Inside Back Cover:
I'm super happy with how this turned out. The front and back covers are chipboard covered with We R Memory Keepers new White Out line--Explore. Inside there are 8 pieces of cardstock. I'm just amazed at how easy and quickly this went together. It could be done in any size and would make great gifts.

Friday, November 30, 2007

Giving Well: Project #7- Birthday Calendar

A Birthday Calendar just in time for MY birthday!!!


Each page has space to list everyone's birthday for the month. Make's gift and card giving much much easier! No need to add it to your calendar each year. Just jot it down once and your set!


The name plate on the front cover is blank right now. I don't want to give anything away!!! I will add the receipients name to it later. Super easy project that comes together very very fast.

Supplies:
Daisy D Paper--MemoryWorks July Express Kit
White Cardstock
Chipboard
Ribbons--MemoryWorks July Express Kit
Assorted stickers
2 0-rings

Wednesday, November 28, 2007

Giving Well: Project 13- Trading Cards Mini-Album

A quick and easy project! I just love the button pull tab--so cute! Inside are 12 trading cards ready for pictures of the holiday season. The cards are held together by the corners so that they fold out into a long strip.


Whose getting this gift??? That's a surprise!!!

Supplies used:
7 Gypsies Artist Trading Cards Matchbox Kit (MemoryWorks Sept Express Kit)
My Mind's Eye- Festive Theme Set
Prisim- Suade Brown Cardstock
Autumn Leaves- A Rhonna Christmas Bag-o-Buttons
Autumn Leaves- A Rhonna Christmas Card Acrylic Stamp
Colorbox- Chocolate & Blueberries Liquid Chalk
Brown Acrylic Paint
Brads

Friday, November 23, 2007

Giving Well: Project #10- Book Lover's Log


Another fun project using my "girly" paper!! This started out as a cheap notebook ($.50). I covered the front and back covers with cute lined patterned paper (MemoryWorks July Express Kit!). I then covered the inside with plain pink cardstock. To add the tabbed pages I took all the pages off the spine and added 3 cardstock pieces the same size. The tabs are labled--"Books to Read", "Books Read", "Thoughts About Books". To personalize it I added the receipiants first initial to the back cover. Put it back together and it's done! A very inexpensive personalized notebook!

This is another gift for one of my daycare kids. This school-aged girl loves to read and write. I will pair this with a storebought book, a bookmark to match the notebook, and a pen. She'll be all set!

Thursday, November 22, 2007

Giving Well: Project #8- Storage Drawers


Super cute mini wooden dresser! Started out as a pain mini wooden dresser from Michael's for $6 ($3 with my coupon!). First I stamped the drawers using my acrylic Autumn Leaves Swirl stamps. Next I added some paper to the sides using Mod Podge (Basic Grey Romani paper). To personalize it I added her name using the monograms from the same paper line (inking the edges to make the letters pop out a little more). For a final touch I painted each knob a different color to match the paper.

I made this for one of my daycare kids--6 year old girl. She has really long hair and always has cute clips, rubber bands, and ribbons in her hair. I thought this would make a cute storage for all her hair accessories. I love making stuff for little girls. They are sooo fun! Boys are much, much harder to craft for!

Friday, November 16, 2007

Giving Well: Project #4- Cigar Box


This is a gift for someone that I think will use this to hold their teasures in (I will add a gift card and/or small journal inside for the recipient). I purchased a cheap cigar box from Michael's and covered the inside and outside with patterend paper (MemoryWorks August 07 Express Kit!). After taking the picture I stamped the receipients name on the top. Since I don't want to spoil the surprise--I couldn't take a picture of the finished product (maybe after Christmas!). I also added a few swirl stamps on the top. I may still tie a few charms or something to the ribbon.

The wrapping job is such a great idea--instead of a plain paper bag I added a "bag collar". I first measured the outside of the bag and then cut chipboard to fit. I covered it with wrapping paper and cut a slit in the center for the handles. This keeps anyone from peeking in the bag! Very cute and something that can be reused again. Mine doesn't lay very flat. I should have used a bigger bag. After I have added a few things to the box I will tape the top of the bag shut. Add a gift tag and I'm set! All ready for Christmas--1 month early! Wow!

Thursday, November 15, 2007

Giving Well: Project #6- Photo Album

Argh! I have so many projects going right now! I have decided that I'm not a very good multi-task-scrapbooker. Projects 3, 4, & 5 in "the works". My Christmas album has been kinda pushed out of the way right now. I'm really getting into these Christmas gifts. I love the idea of homemade gifts for everyone. I know that if I put it off for later it won't happen. So...I'm plugging away at this class. I should have a couple more projects to show you in the next few days. Keep your fingers crossed!!!

Anyway....off my little soapbox and on to this project....
This was a fun, quick, easy gift. I purchased a nice leather album for 4x6 photos (with my 50% off coupon at Michaels!). I'm giving this to someone that doesn't scrapbook. They can just slip their photos right in the album and have them ready to take anywhere. But--I couldn't just leave it at that! To jazz it up and make it more personal I added a few touches. To the cover I added a few rub-ons. On the inside I created a front and back cover for the album. Each one mirrors eachother with a different quote. I've decided not to put pictures in it--they can add their own.

I'm really excited to give this gift. Obviously this will go to a family member, but I'm not telling whoooo!!!!

Saturday, November 10, 2007

Crazy About Kits!- Week 5


This week I will be creating an entire 8x8 album! I am super behind on my Christmas photos so I will be using our 2004 Christmas pictures. I have purchased the new Cosmo Cricket Be Good Theme Set, Journal Cards, and Ornament Fashions. Total MemoryWorks cost= $14.25. I think I can stretch it all out for the entire 20 page album--this will be a challenge, but I think it's do-able. Our instructor has given us a bunch of sketches that we can scraplift for the album. This should make everything come together much quicker. I have printed the pictures, decided on the page order, and picked out some sketches to use. Hopefully I will get started tomorrow! A whole album in 1 week seems kinda scary, but I think by using some shortcuts things will come together quick. Stay tuned!

Friday, November 9, 2007

Giving Well: Project #2- Embellished Photo Mat


Hopefully my sister won't look at my blog within the next 2 hours because this is a baby shower gift for her! I love this! I took a plain 11x14 mat and had it cut for a 5x7 photo. Stamped a few flowers around the edges and added some rub-on words. Once the baby is born she can add a special picture of "baby Zach" in the frame. I'm super excited--I hope she likes it!! Aunt Sarah isn't excited is she???!!!

One cool feature to the class is that they also give you ideas on how to wrap your gifts! For the frame I added wire ribbon, brought it up through the center of a flower, and tied it off. I also continued the stamping theme on the frame and stamped Jenny's name on the wrapping paper. Just a couple extra elements really make the gift seem that much more special. AND--she can reuse the flower for something else!

Thursday, November 8, 2007

Crazy About Kits!- Week 4 (DONE!)

I'm a week behind in the class--BUT I'm still getting stuff done! Only 2 more weeks to go.... I made pretty good use out of my homemade kit. I think I kept every last scrap!

Here's a photo of what I created with my kit. Lots of altered stuff--fun, fun, fun:
Here's a photo of what I have left. Lots of letters and brads but not much else!:

Wednesday, November 7, 2007

Crazy About Kits!- Week 4 (mini book)


For my last assignment in week 4 I altered a small board book. I haven't put pictures in it yet, I still need to pick out some. This was a great way to use up a few last scraps from a kit. Since it's so small it will fit perfectly in my purse to show off wherever I am!

Sunday, November 4, 2007

Giving Well: Project #1- Christmas Cards


So excited to get a few new ideas for Christmas cards. My original plan was to mass produce one card, but after making 16--I'm already tired of the card! Now I have more designs to choose from. The hard part is deciding which 2-3 I like the best!

Saturday, November 3, 2007

Crazy About Kits!- Week 4 (Altered Tissue Box)


Another fun altering project! This time I altered a plain wooden tissue box (found at Michael's for around $3). I decided to keep it simple with just a single sheet of patterned paper. I first cut and glued cardstock on all sides to use as a base (you could also paint). I then cut slightly smaller squares of patterned paper and placed them on 4 sides. Since I didn't have enough paper to cover the top I decided to do some stamps, doodling, and a few buttons & flowers. I think it turned out pretty cute. This will go in my scrappin' spot once I have it organized. The walls are painted a creamy light orange and orange so this will match perfect!

Friday, November 2, 2007

Giving Well (in 2 hours or less)

Because I'm crazy and I obviously have no life.....I signed up for yet another Big Picture Scrapbooking class! I still have 2 weeks left in my Crazy About Kits class, but started this class on Nov. 1st. The nice thing is I can aways do the projects anytime I want. It's more about getting ideas than anything.

My new class is called--Giving Well (in 2 hours or less). The focus of the class is creating projects to give as gifts. Since Christmas is right around the corner I thought this would be a fun way to get ideas. I would LOVE to make a bunch of gifts to give away. Not only would it make things cheaper, but I would have fun and learn new things along the way. Every other day a new project is posted. I hope to create many of the projects. I may post some of them here right away, others I may wait to post until after Christmas. I don't want to spoil any surprises!!! Hopefully I can get a jump start on things this weekend. Our first project is Christmas cards. I just started mass production on our Christmas cards last weekend. I'm excited to have more ideas. Stay tuned......

Wednesday, October 31, 2007

Crazy About Kits!- Week 4 (Altered Star)


Very cute little star! This is a small ornament size star, but you could also purchase a larger one to cover and hang on the wall. I'm keeping mine as a decoration on my shelf in the computer room. I purchased another one to alter, but I think I'm going to wait and possibly cover it with Christmas paper for the holidays.

Tuesday, October 30, 2007

Crazy About Kits!- Week 4 (Altered Clipboard)


Today I altered my first clipboard. I've seen this done a bunch of times online, but I've never done it myself. It was fun! All the paper is adhered on the clipboard using Mod Podge. After everything was in place I put a light layer of Mod Podge over the top to give it a nice sheen and seal it on. To brighten it up a little I added a few Prima Flowers with brads and a ribbon to tie a pen to. To my amazement the crop-a-dile went through the clipboard!!! That thing is amazing!

Crazy About Kits!- Week 4 (1 photo layout)


I just love this photo! I wanted to capture the 'face behind the mask' and journal about how special the moment was. Layering all the paper added a really easy, different way to mat the photo.

Saturday, October 27, 2007

Crazy About Kits!- Week 4 (3 photo layout)


I was a little unsure about putting everything a little askew, but I really like it. Very fun page to create!

Crazy About Kits!- Week 4

This weeks first assignment was to "create your own kit". Go shopping!!!! Fun, fun, fun... While the boys went to a football game I headed over to the local scrapbooking store and picked out my supplies for this week.

With all the leaves changing and autumn colors all around, I used that as my inspiration point--oranges, browns, greens. I tried to stay away from using a whole line and really tried to mix and match with different companies. Here's what I came up with:

1 sheet Fancy Pants- Fancy True Paper: Natural
1 sheet Fancy Pants- Fancy True Paper: True-Blue
1 sheet The Robins Nest- Fall Plaid/Stripe
1 sheet Basic Grey- Stella Ruby: Ladies Book Club
1 sheet Basic Grey- Stella Ruby: Coffee with Dessert
1 sheet Imaginisce- Out on a Whim: Sweet Pea
1 sheet Brown Pinked Cardstock (brand??)
Rusty Pickle- Cap'n Jack Alphabet Stickers
Creative Impressions- Matte Heritage Mini-Round Fasteners (100)

Many of the colors match well with the Basic Grey- Mellow line I just used, so I will also draw some of the ribbons and buttons I have leftover from that.

Total cost= $12.31

I wish that I had taken a picture of everything before getting started, but I didn't. I could wait!

Crazy About Kits!- Week 3 (DONE!)

For week 3 I purchased the Basic Grey- Mellow Collection from the brand new MemoryWorks Product Supplement Catalog. Here's a picture of the paper and a list of everything I started with:
  • Theme Set: 8 sheets of cardstock patterned paper, 1 sheet of 2" die-cut monograms, and 1 sheet of coordinating die-cut shapes
  • Mini-Monogram letters *not pictured
  • Ribbon- 5 yards *not pictured
  • Buttons- 1/4 cup assorted sizes *not pictured
Total MemoryWorks cost= $24.00

Here's what I created out of the kit:


  • 3 12x12 layouts (1 2-page layout)
  • 3 cards
  • Brothers mini album
  • Altered box
Here's a picture of what I have left:
I loved playing with this kit! I would highly recommend it to everyone!